User interface
Main elements
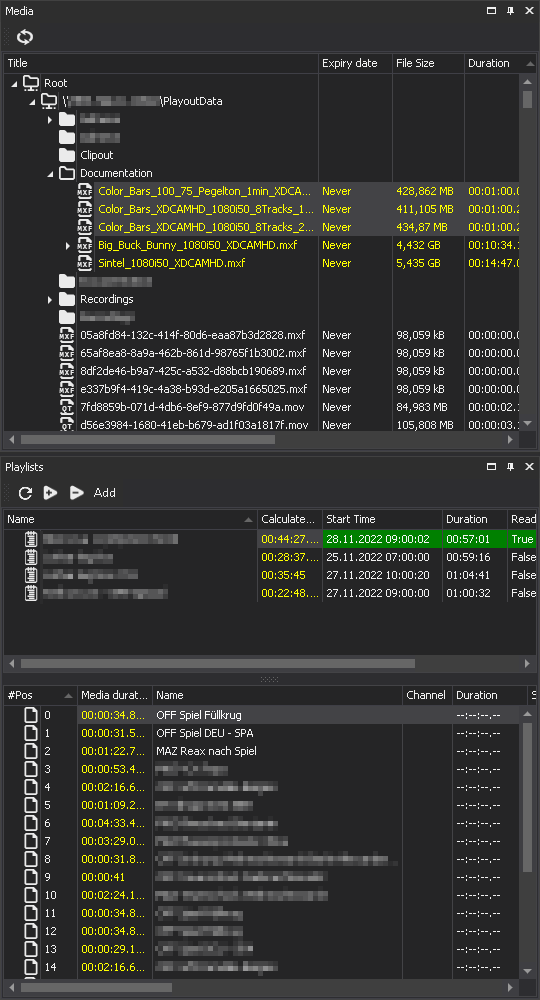
Clipbox provides a customizable user interface that is suitable for various use cases. The main elements (windows) can be freely positioned by docking or undocking them (for more information, see section Customizing the user interface). In addition, the elements to be displayed and the color highlighting of most windows can be configured via the Clipbox system settings.
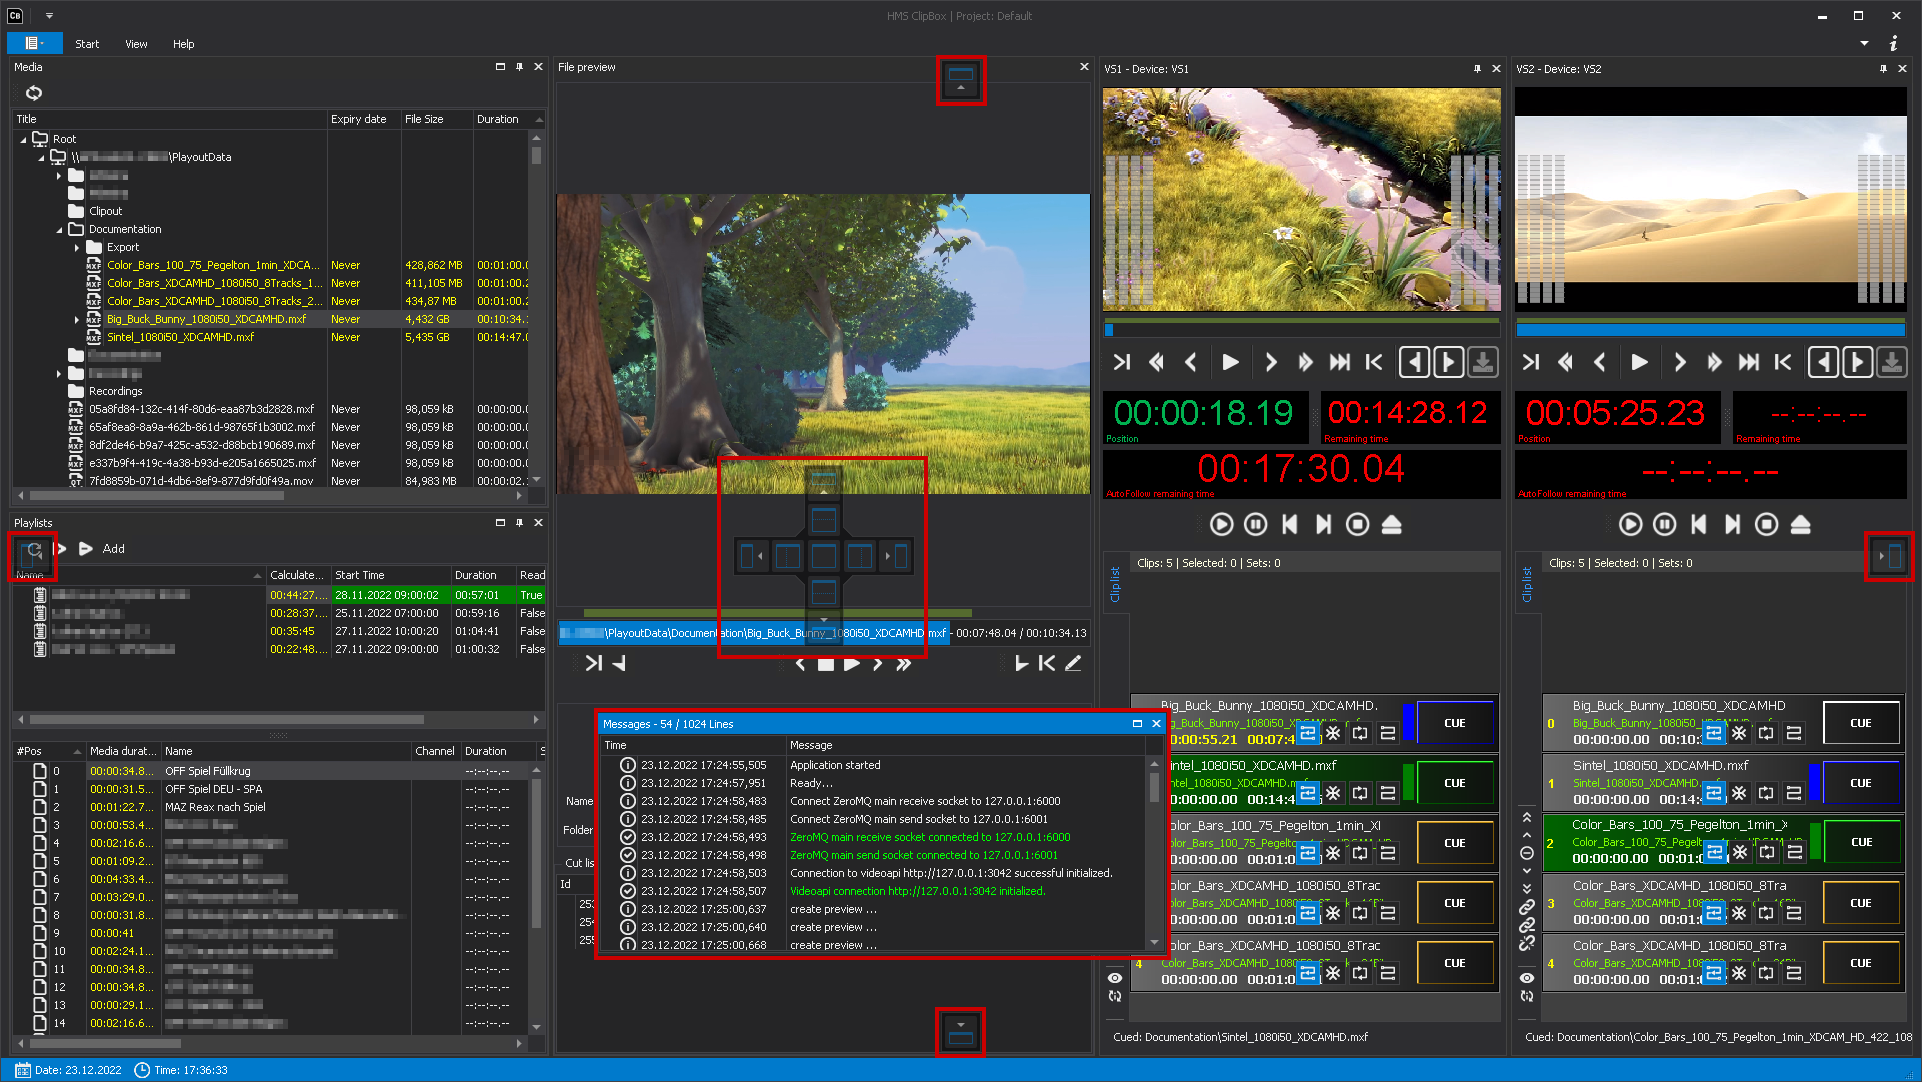
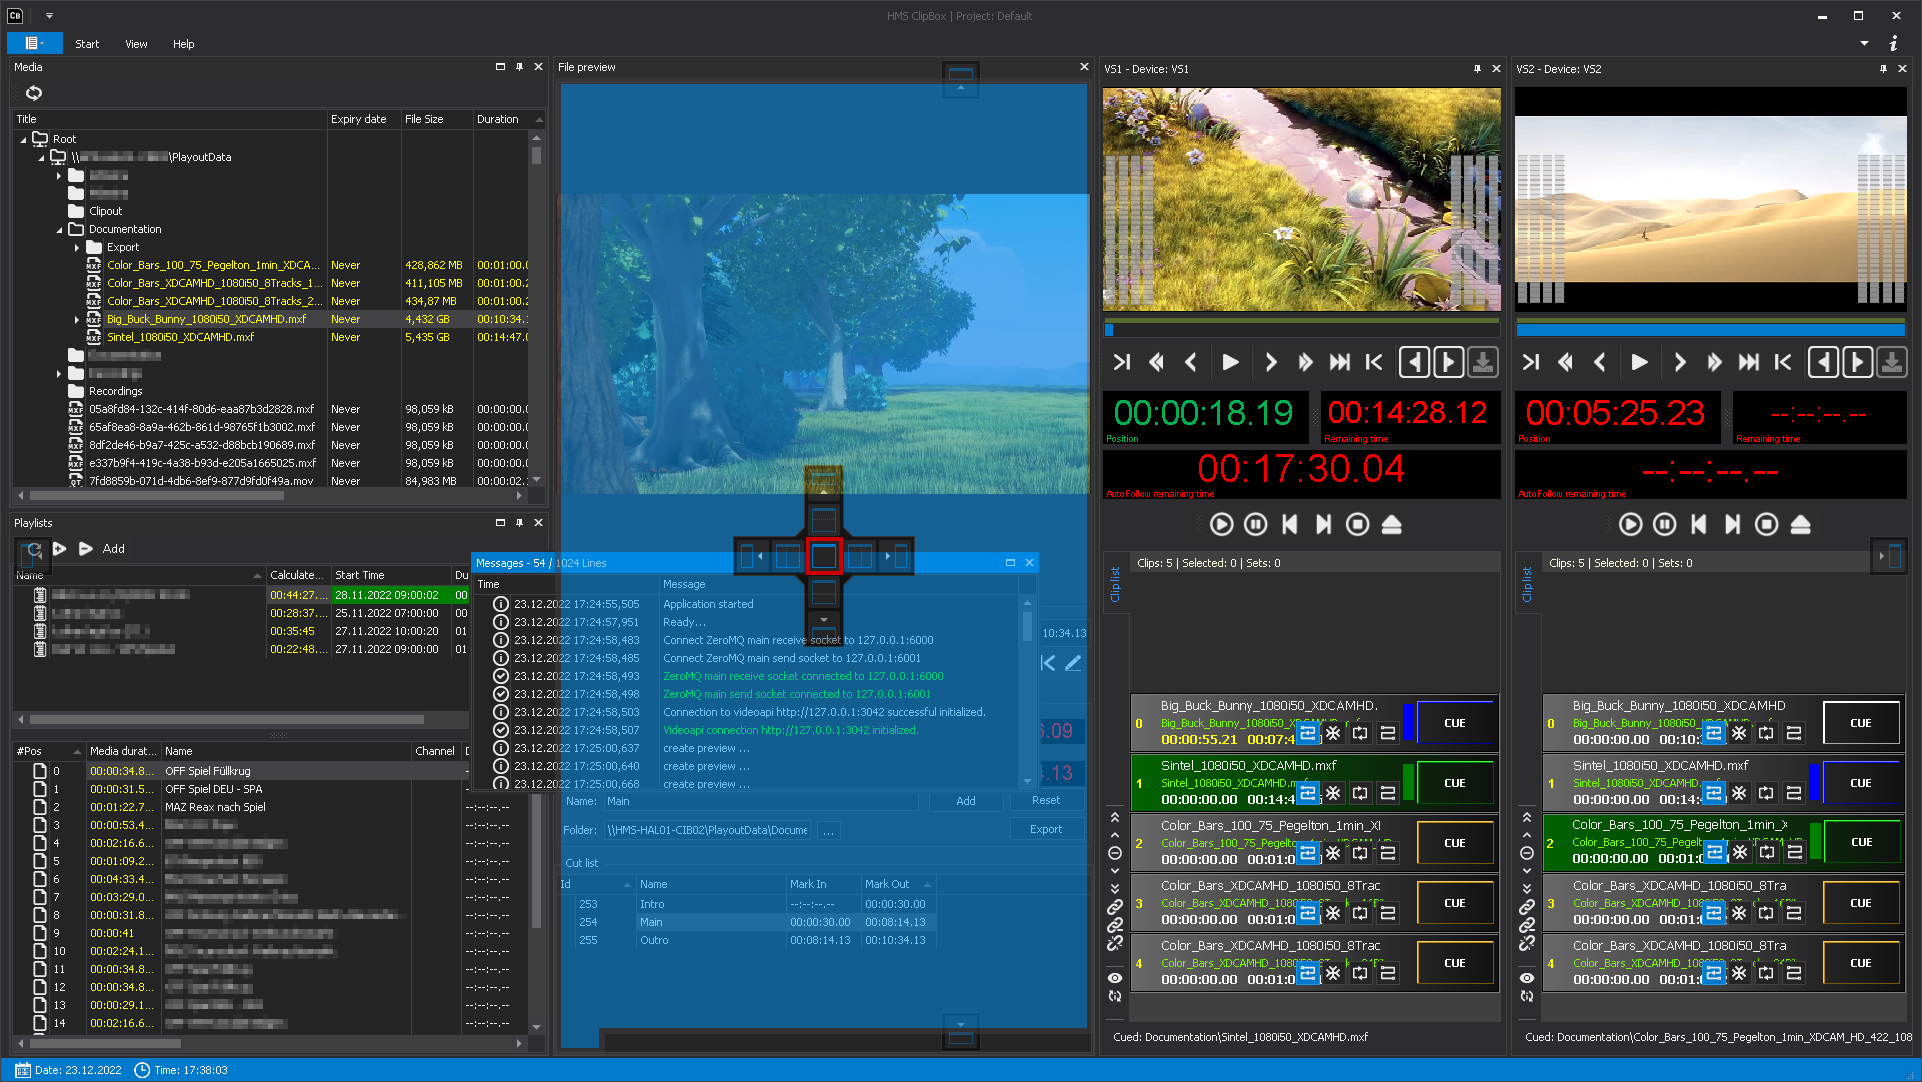
The following image shows an example arrangement of the main elements of the user interface:
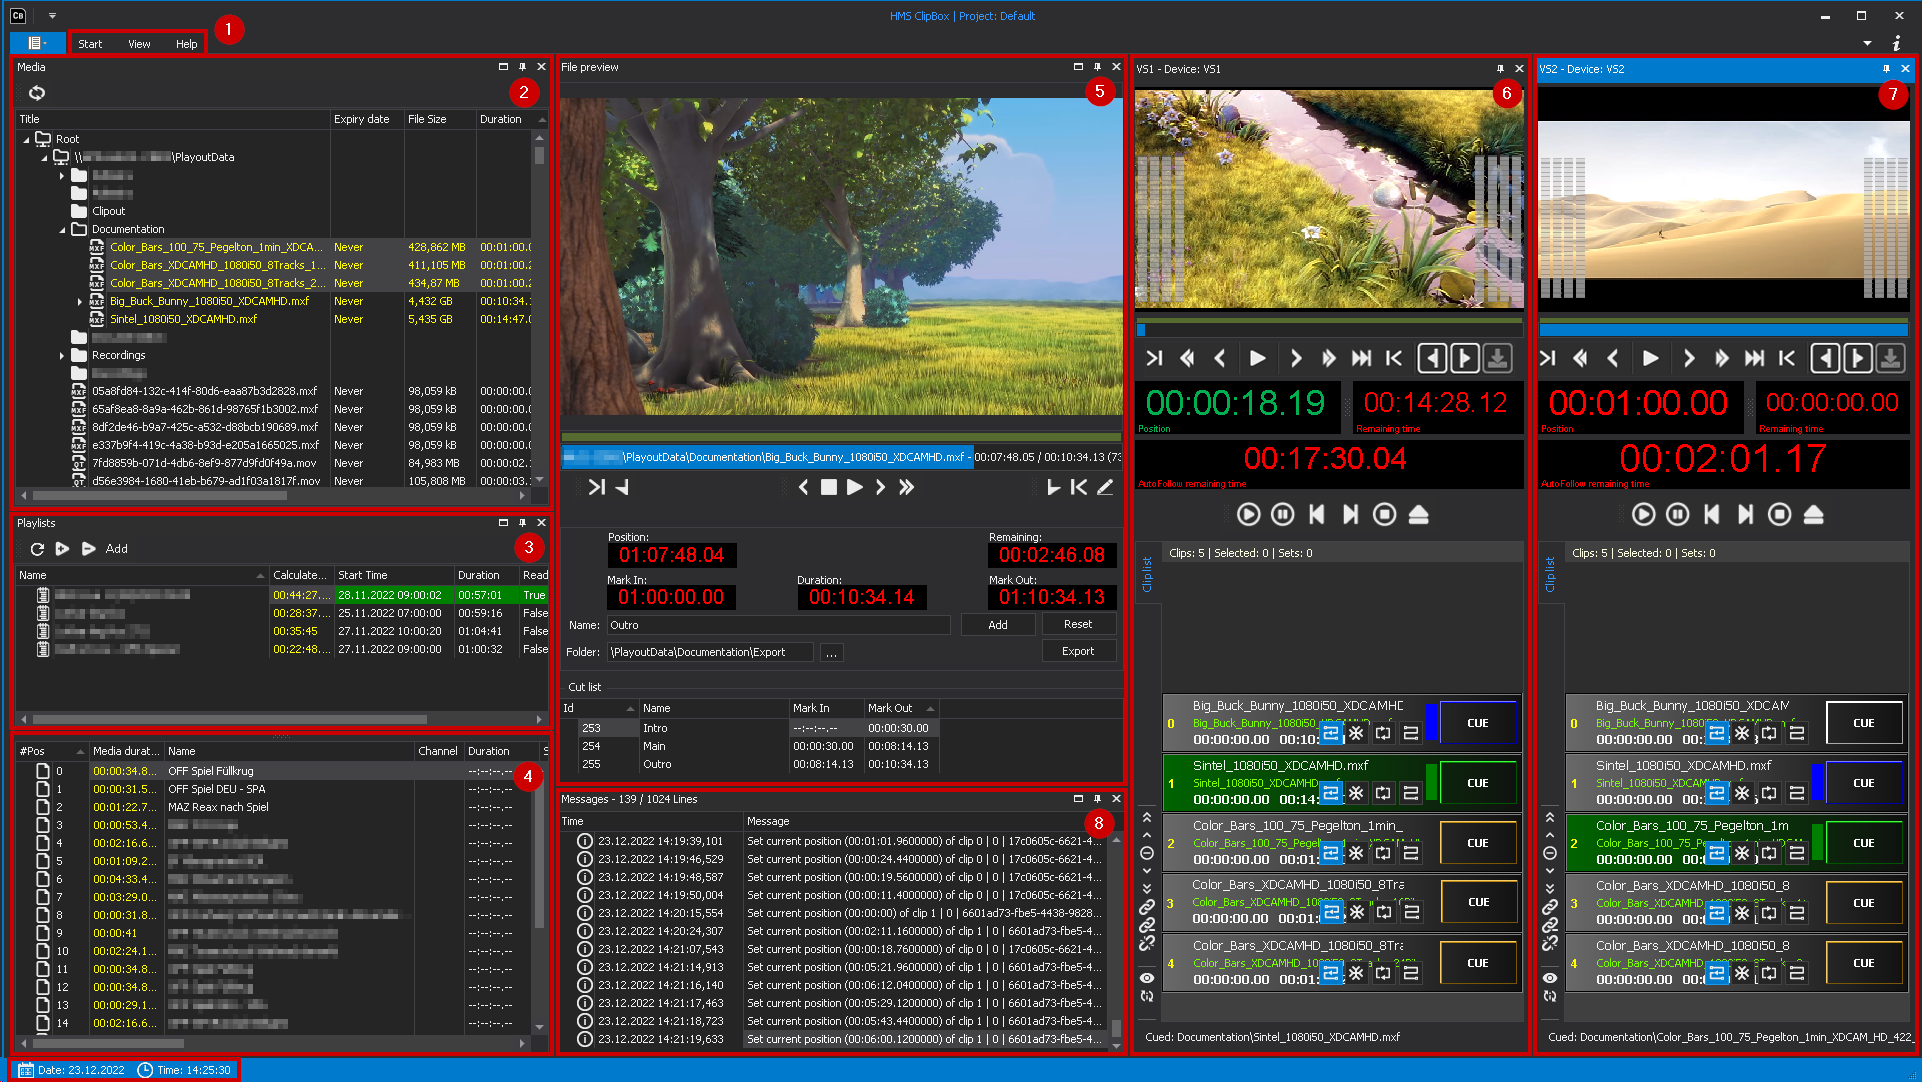
(1) - Menu/toolbar
(2) - Media - list of all available files
(3) - Playlists - list of playlists imported from a connected NRCS
(4) - List of all files contained in the selected playlist
(5) - File preview
(6) - Player "VS1"
(7) - Player "VS2"
(8) - Messages - list of system messages
(9) - Status bar
As an alternative display variant when connected to an NRCS, Clipbox also provides the cockpit view, which consists of the following elements:
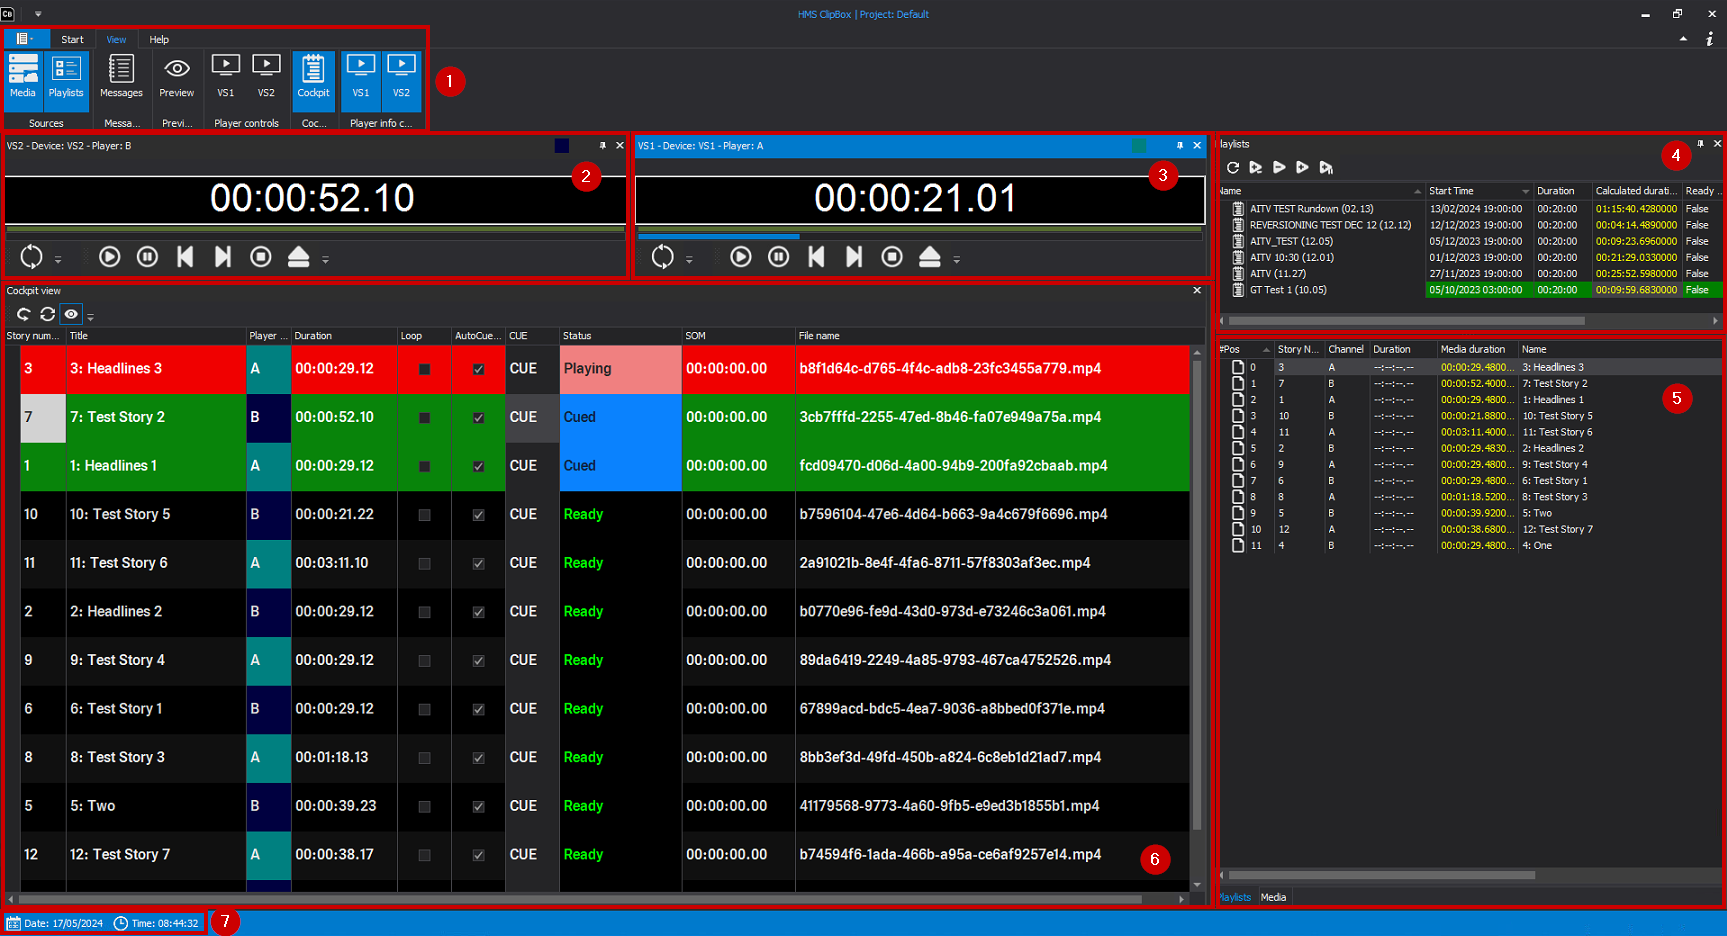
(1) Menu/toolbar
(2) Player information and control for player "VS2"
(3) Player information and control for Player "VS1"
(4) Playlists imported from a connected NRCS
(5) List of all files contained in the selected playlist
(6) Cockpit
(7) Status bar
The toolbar of the main window contains the following areas:
-
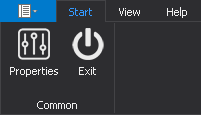
Start
-
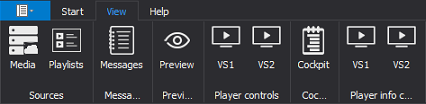
View
Tip
All windows available within the Clipbox user interface are listed in the View area. Each window can be displayed or hidden individually, by clicking on it. Displayed (activated) windows are highlighted in blue.
-
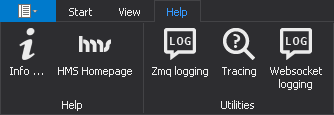
Help
Tip
The toolbar can be expanded and collapsed by clicking on the triangle  on the right-hand side. Alternatively, you can expand and collapse it by clicking on the corresponding area of the menu bar.
The areas of the toolbar contain the following functions:
| Area | Symbol | Function |
|---|---|---|
| Start | Properties | Open the options menu (system settings) Warning Incorrect configuration can lead to system failures. The settings should therefore only be changed by trained personnel. |
| Exit | Close the Clipbox application | |
| View | Media | Show/hide the Media window |
| Playlists | Show/hide the Playlists window | |
| Messages | Show/hide the Messages window | |
| Preview | Show/hide the File preview window | |
| VS1 | Show/hide the window for player "VS1" | |
| VS2 | Show/hide the window for player "VS2" | |
| Cockpit | Show/hide the Cockpit window | |
| VS2 | Show/hide the player info and control window for player "VS1" | |
| VS2 | Show/hide the player info and control window for player "VS2" | |
| Help | Info | Show information about the Clipbox application |
| HMS Homepage | Open the Qvest Stream website | |
| Zmq logging | Enable/disable log messages | |
| Tracing | Enable/disable tracing | |
| Websocket logging | Enable/disable WebSocket message logging |
Notice
The Tracing function is used together with the DebugView application for event monitoring. Websocket logging creates an additional WebSocket log file in the LocalAppData folder. Both functions can be used for error analysis and should only be used by trained personnel.
Media
The Media window provides a listing of all files available and playable in the Clipbox system. A distinction is made between a listing of files in a configurable source directory (Media window) and a listing of playlists (Playlists window) and the files used in them from a connected NRCS.
For more information about the Media window, see chapter Listing files.
Player
Each player configured in the system can be controlled via its own Player window (also referred to as "Card Player"). It is used to create clip lists either manually or by using playlists and to control playback.
Every Player window can be displayed or hidden via the menu bar of the main window via View > Player controls. To do this, activate or deactivate the icon of the corresponding player (usually named "VS1", "VS2", etc.).
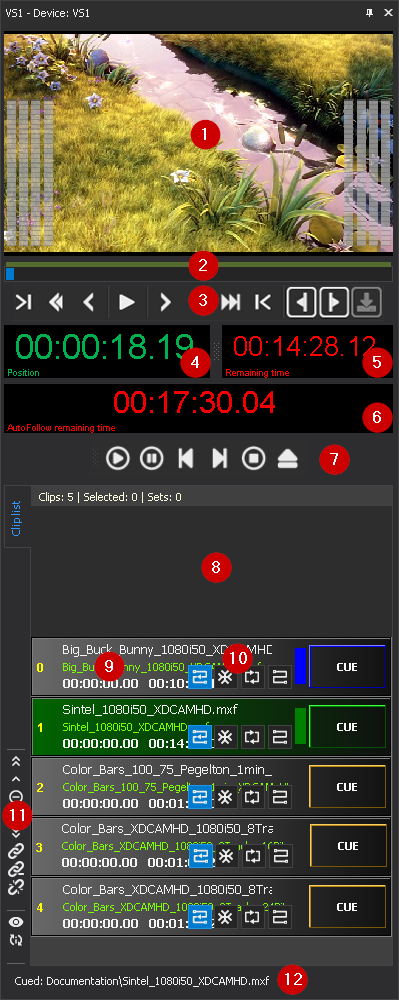
The Player window consists of the following elements:
| No. | Element | Function | Notice |
|---|---|---|---|
| 1 | Video preview | Video preview (backchannel) of the output signal of the selected player incl. audio level (VU meter) and timecode display | The preview of a player can be activated and deactivated by double-clicking in the preview area of the player or via right click > Activated. Alternatively, the video preview can be completely hidden via the Clipbox system settings. Audio output is disabled by default in the preview. To enable audio playback, disable muting via the option right-click > Mute. The timecode display is optional and requires appropriate hardware. For more information, contact support.stream@qvest.com. |
| 2 | Timeline | Jump to specific position in the currently playing file and show current playback progress | Use the timeline to jump to any position within the currently playing file by clicking the corresponding position in the timeline. |
| 3 | Edit mode | Controls for edit mode | See: Edit mode |
| 4 | Position | Current playback position | To switch between displaying the playback position and the timecode position, double-click the time display in the Position field. The timecode position may be different from the playback position if the file being played contains timecode metadata with a different start timecode (different than `00:00:00:00`). |
| 5 | Remaining time | Remaining playback time | - |
| 6 | AutoFollow/group remaining time | Remaining playback time of all files in the clip list (AutoFollow/group) | The remaining time either refers to all clips with enabled option AutoFollow or to a created group. To switch between the two display options, double-click the time display (for more information: see Playback control). |
| 7 | Playback control | Toolbar for controlling the playback of the selected player | - |
| 8 | Clip list | List of clips to be played | When switching between two clips, the clip list view is automatically updated to show the currently running clip centered in the list. The Clipbox system settings provide various options for adjusting the display and color highlighting of clips. These include, for example, the color highlighting of grouped clips, clips in a playlist and the highlighting of the next clip to be played from a playlist by flashing. It is also possible to show or hide an optional "Reload" button for manually updating the clip list. |
| 9 | Single clip | Single clip within the clip list | - |
| 10 | Playback options | Toolbar with playback options for the selected clip | See: Playback options |
| 11 | Clip list editing | Toolbar for editing the clip list | See: Clip list editing |
| 12 | Prepared/loaded file | Path and name of the file currently loaded/prepared | - |
Tip
The labels of the time displays (4), (5) and (6) can be enabled or disabled. To do this, right-click on any of these elements and toggle the desired option in the context menu.
Edit mode
Notice
To use the edit mode, the corresponding toolbar must be enabled. The edit mode toolbar is an optional component of the Clipbox user interface that can be enabled or disabled via the Clipbox system settings. The Clipbox system settings should only be changed by trained personnel.
The edit mode allows you to trim the clip currently loaded by the player and to control its playback.
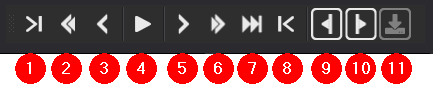
The edit mode toolbar consists of the following elements:
| No. | Symbol | Function |
|---|---|---|
| 1 |  | Jump to mark in |
| 2 |  | Medium jump back |
| 3 |  | Small jump back |
| 4 |  | Play/Pause |
| 5 |  | Small jump forward |
| 6 |  | Medium jump forward |
| 7 |  | Jump to end |
| 8 |  | Jump to mark out |
| 9 |  | Set current position as mark in |
| 10 |  | Set current position as mark out |
| 11 |  | Save material markers (without function) |
Playback control
Each player can be controlled via its playback control.
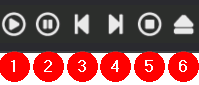
The playback control toolbar consists of the following elements:
| No. | Symbol | Function |
|---|---|---|
| 1 |  | Play |
| 2 |  | Pause |
| 3 |  | Cue previous clip |
| 4 |  | Cue next clip |
| 5 |  | Stop |
| 6 |  | Eject media Notice If a file is already cued (prepared for playback) in the corresponding video server, it is ejected (unloaded) and the video server is set to idle. |
After a single clip is added to the clip list, it is highlighted in gray:

A clip added to the clip list with a file that does not yet exist in the specified source directory can be recognized by a CUE button with a red border:

A clip prepared for playback is highlighted in green:

The clip currently playing is highlighted in red:

If clip playback is scheduled via a planned time, the clip is marked in the upper left corner with a marker in the color of the selected time. In addition the label of the CUE button displays the selected planned time:

The left side shows the following information about the selected clip:
| Symbol | Function |
|---|---|
 | (1) - Color of the selected planned time (not applicable for manual playback) (2) - Number/position of the clip in the clip list |
The file information of the selected clip is listed in the center:
| Symbol | Function |
|---|---|
 | (1) - File name (2) - MOS object ID (3) - Mark in timecode (left)/Duration of the clip considering mark in and mark out (right) |
Playback options
Playback options can be set individually for each clip in the clip list. The following options are available:
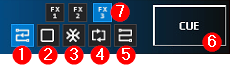
| No. | Symbol | Name | Function |
|---|---|---|---|
| 1 |  | Autofollow | Automatically prepare clip and start playback as soon as the previous clip ends |
| 2 |  | Freeze black | Show black image after the end of the clip playback |
| 3 |  | Freeze last | Show the last frame after the end of the clip playback |
| 4 |  | Loop | Play current clip in loop |
| 5 |  | Autocue next | Prepare next clip automatically without displaying the first frame |
| 6 |  | Cue | Prepare clip playback (load file in the corresponding video server) |
| 7 |  | FX | Transition effect (e.g. blackfade or crossfade) when switching to the following clip (optional, only available if supported by the playout hardware used) |
Notice
Example for the use of file playback options:
Suppose you create a clip list with five clips. To play them in sequence, enable the following file playback options in the specified order for the corresponding clip:
- Clip 1 - no option enabled
- Clip 2 - Autofollow
- Clip 3 - Autofollow
- Clip 4 - Autofollow
- Clip 5 - Freeze last
If you then click the Play icon  in the player's playback control, all five files are played one after the other. After playback has finished, the last frame of the fifth file remains displayed.
Clip list editing
Via the clip list editing you can change the clip list, e.g. by changing the clip order, creating groups and adding or removing clips.

The toolbar for clip list editing provides the following functions:
| No. | Symbol | Function |
|---|---|---|
| 1 |  | Move selected clip to the top of the clip list |
| 2 |  | Move selected clip one position up |
| 3 |  | Remove selected clip from clip list |
| 4 |  | Move selected clip one position down |
| 5 |  | Move selected clip to the bottom of the clip list |
| 6 |  | Group selected clips |
| 7 |  | Remove all clips from group (ungroup) |
| 8 |  | Remove selected clip from group |
| 9 |  | Show file overview |
| 10 |  | Manually synchronize clip list with the connected video server |
Notice
Manual synchronization of the clip list with the connected video server (icon  ) is usually only necessary if the video server has been restarted or its status is unknown.
Tip
If a file cannot be added to a clip list and the message "Duplicate ID" is displayed in the message window, it is necessary to manually synchronize the clip list with the video server as well as to eject any files prepared in the video server.
To do this, first click the Synchronize icon and then the Eject icon  in the playback control of the corresponding player.
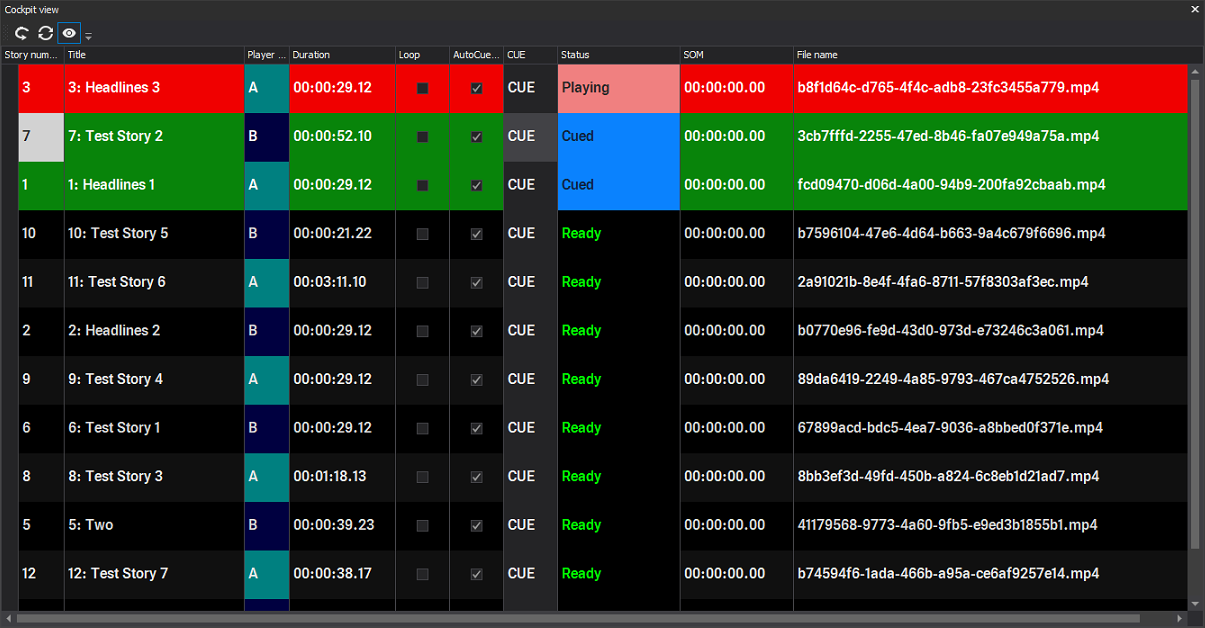
Cockpit
The Cockpit provides an alternative display of the player clip lists and their playback control. It contains similar functions to the Player window, but in contrast to this, it uses a table display which combines the clip lists of all players into a single continuous list. This makes it particularly suitable for users who operate Clipbox with several players in combination with an NRCS and prefer this type of display to the player-specific display.
The Cockpit window can be displayed and hidden via the menu bar of the main window via View > Cockpit.
The toolbar in the upper left area of the cockpit window provides the following functions:
| Symbol | Name | Function |
|---|---|---|
| Reload | Refresh the Cockpit display | |
| Sync + Reload all players | Synchronize clip lists of all players with the corresponding video servers and update the Cockpit display | |
| Force display of active clips | Jump to currently active clips within the cockpit clip list |
The list displayed below summarizes the contents of the clip lists of all players. In addition to details of the individual clips, the list provides access to the following playback options:
| Column | Function |
|---|---|
| Loop | Activate/deactivate Loop playback option of the clip (identical to the corresponding function of the player playback options) |
| AutoCue | Activate/deactivate playback option Autocue next of the clip (identical to the corresponding function of the player playback options) |
| CUE | Prepare playback of the clip (identical to the corresponding function of the player playback options) |
Tip
You can customize the display of the Cockpit clip list by right-clicking on one of the available columns. In the context menu that appears, select the desired option, e.g. Column Chooser.
In addition, the Clipbox system settings provide further configuration options, e.g. to adjust the color highlighting of individual elements or the font sizes used.
Player information and control
The player information and control window contains a configurable display of the remaining time of the clip currently prepared for playback or running in the corresponding player. It also includes the same Playback control as used in the player window and is particularly suitable as an addition to the Cockpit.
It can be displayed and hidden via the menu bar of the main window via View > Player info, by activating or deactivating the icon of the corresponding player (usually named "VS1", "VS2", etc.). The window consists of the following elements:
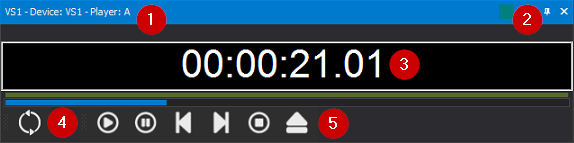
| No. | Function |
|---|---|
| 1 | Name of the player |
| 2 | Highlight color of the player (used, among other things, for better visual distinction in the cockpit view as to which file is played via which player) |
| 3 | Remaining time of the currently prepared or running clip (incl. display of the playback progress and color highlighting of the time display as a countdown during the last 10 seconds of playback) |
| 4 | Synchronize clip list manually with the corresponding video server (identical function as symbol 10 in the clip list editing toolbar) |
| 5 | Playback control (identical function as the player playback control) |
File preview
Overview
The File preview window allows frame-accurate playback of files, trimming of clips as well as creating subclips. It can be displayed and hidden via the menu bar of the main window via View > File preview. It consists of the following elements:
Notice
When using the File preview, only the video content of a file is played. Existing audio tracks are muted during preview playback.
The File preview window consists of the following elements:
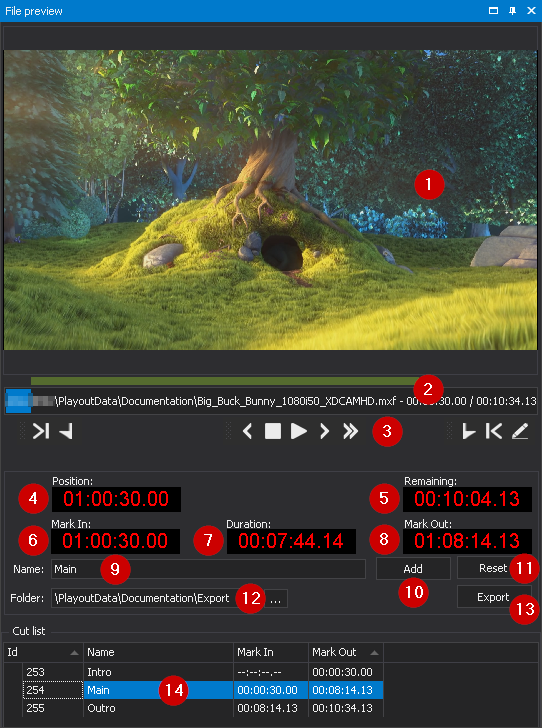
| No. | Element | Function | Notice |
|---|---|---|---|
| 1 | Video preview | Preview image of the current playback position of the selected file | - |
| 2 | Timeline | File and playback information (file path and name, current time index, total duration, playback progress) | Use the timeline to jump to any position within a file by clicking on the corresponding position. |
| 3 | File preview toolbar/controls | Controlling the file preview playback | - |
| 4 | Position | Current playback position | Clipbox provides the following two display variants for the timecode displayed in the Position field: Variant 1 ("TimeCode mode" option enabled): Based on the timecode contained in the file's metadata. Variant 2 ("TimeCode mode" option disabled): Starting at `00:00:00:00`. You can switch between both variants, by right-clicking on the Position field and enabling or disabling the "TimeCode mode" option. |
| 5 | Remaining | Remaining playback time until the end of the file | - |
| 6 | Mark In | Current mark in time code | - |
| 7 | Duration | Duration of the section marked by mark in and mark out | - |
| 8 | Mark Out | Current mark out time code | The current values of the three time displays Position, Mark In and Mark Out can be entered via keyboard commands. To do this, click on the corresponding segment of the time display, enter the desired time code and confirm with [Enter]. |
| 9 | Name | Name to be used for creating a trimmed section or subclip and name of the section currently selected in the Cut list. | - |
| 10 | Add | Trim file | By using this function, the selected section will be transferred to the Cut list in the lower part of the File preview window and displayed in the Media window as a subordinate element of the corresponding original file. |
| 11 | Reset | Reset or remove set mark in and out points and the selected name | - |
| 12 | Folder | Destination folder to be used for saving created subclips | - |
| 13 | Export | Create subclip | The selected section is saved as a separate file in the selected destination directory using the specified name. The Export button appears only if the optional Clipbox add-on module "Clipout" is enabled, which is required to create subclips. For more information, contact support.stream@qvest.com. |
| 14 | Cut list | List of marked (trimmed) sections of the file | - |
Tip
To open a file in the File preview window, either right-click the file in the Media window or in the player clip list and select Open in preview from the context menu. The Preview window must be enabled for this.
Toolbar
The File preview toolbar provides the following functions:

| No. | Symbol | Function |
|---|---|---|
| 1 |  | Jump to mark in |
| 2 |  | Set mark in at current position |
| 3 |  | Previous frame |
| 4 |  | Stop preview playback |
| 5 |  | Start preview playback |
| 6 |  | Next frame |
| 7 |  | Fast forward |
| 8 |  | Set mark out |
| 9 |  | Jump to mark out |
| 10 |  | "Take" - Apply trimmed section (defined by the current mark in and mark out) to the corresponding clip in the clip list of the player |
Notice
To add a trimmed section to the player's clip list, the clip must first be loaded from the player's clip list into the File preview window. To do this, select a clip in a player's clip list and choose Right-click > Open file in preview. You can then trim the clip using the File preview window and apply the trimmed section to the player's clip list.
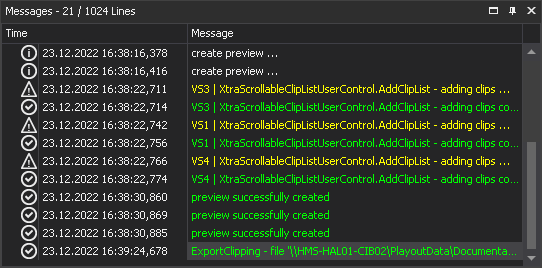
Messages
The Messages window contains status messages that are marked with corresponding icons and colors depending on their type and meaning. It can be displayed and hidden via the menu bar of the main window via View > Messages.
Customizing the user interface
You can customize the positions of the Clipbox user interface windows according to your own specifications. The main areas can be arranged almost arbitrarily.
Changing the arrangement of the windows
To change the arrangement of a window, proceed as follows:
-
Click on the header of the corresponding window.
-
Hold down the left mouse button and drag the window to the desired position.
Notice
The user interface offers you possible directional positions for docking windows on the screen (top, bottom, left or right). If you move the selected window within an open window, an additional icon appears. There you can dock your window at one of the four directional positions.
Rearranging areas of the user interface
The arrangement of the windows is changed.
To dock a window at a suggested position, proceed as follows:
-
Left-click on the header of the window.
-
Drag the window to the desired position while holding down the left mouse button.
The respective position is highlighted in blue as a preview.
Docking a window to a position
The window is docked at the selected position.
To undock a docked window, proceed as follows:
- Double-click the header of the respective window.
The window is undocked and displayed separately.
Tip
To dock the window back at its original position double-click again.
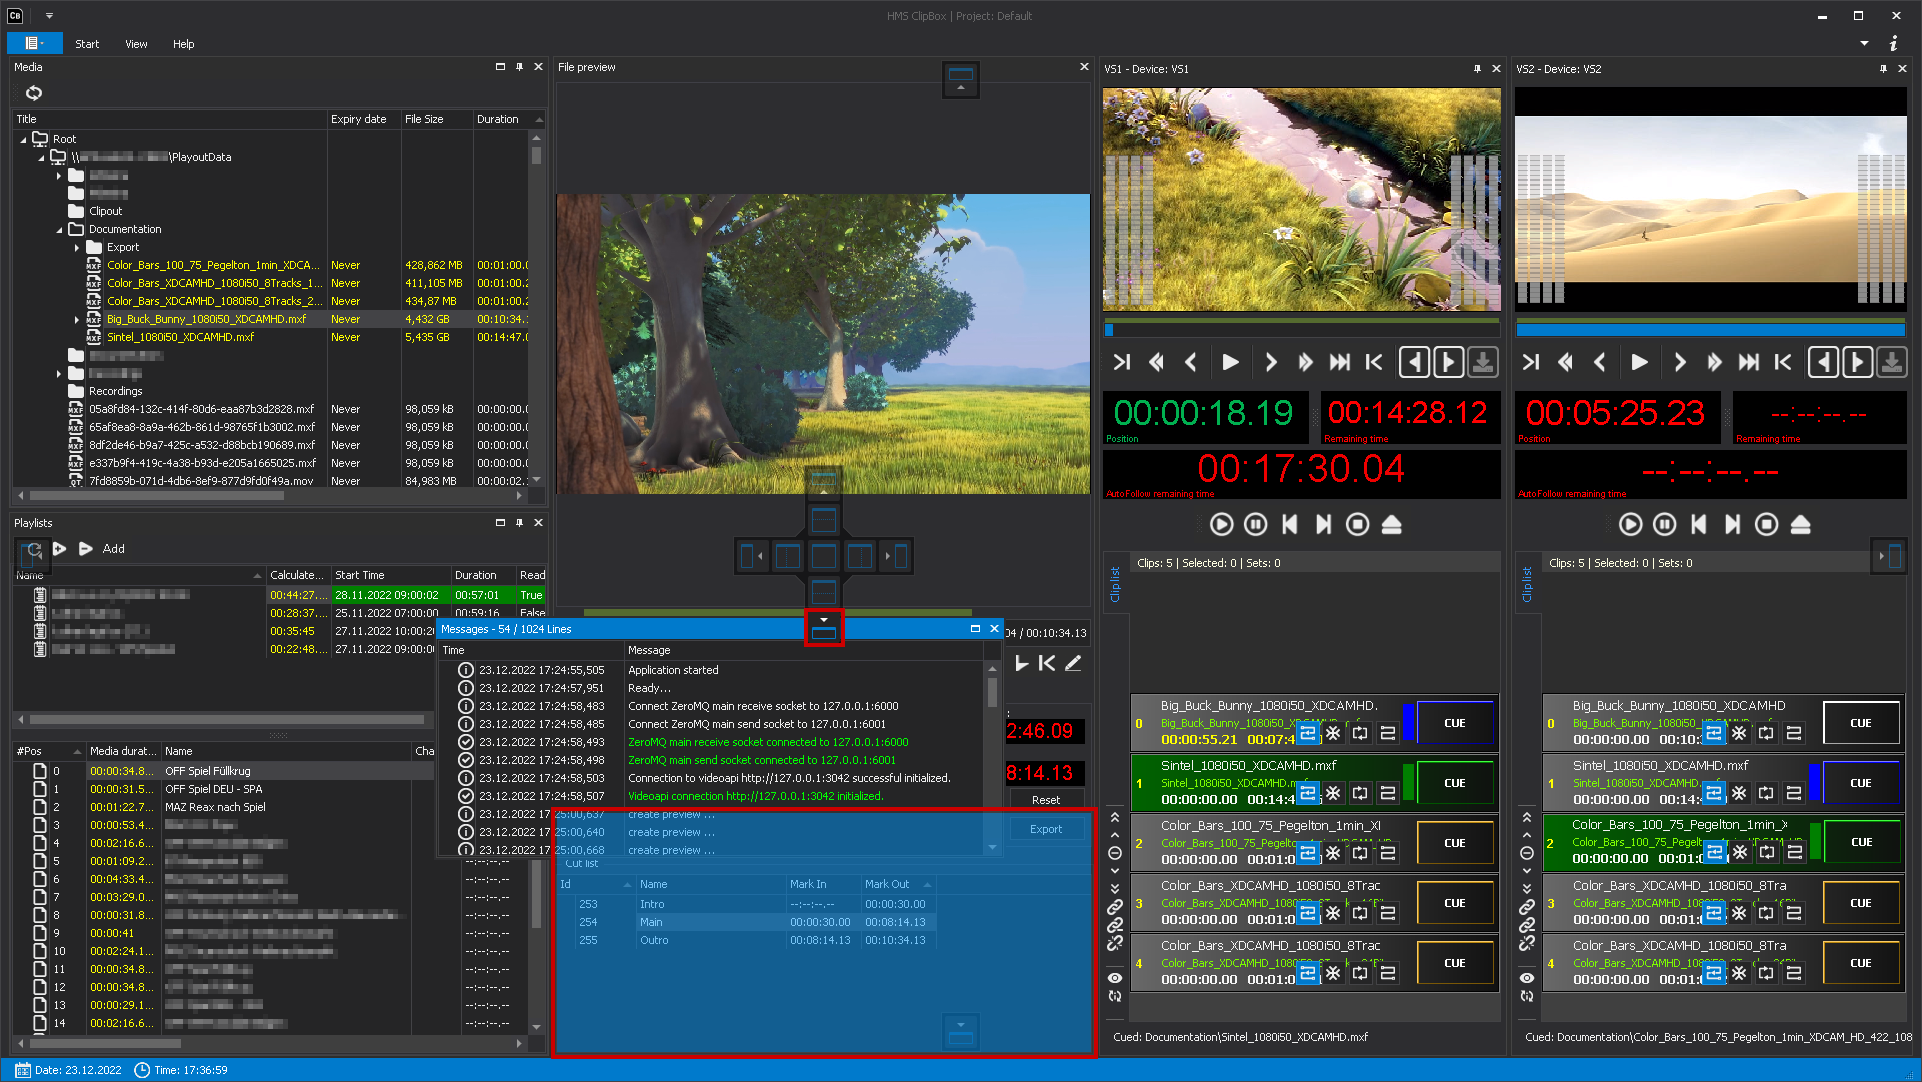
Combining multiple windows
You can group multiple windows into a tab bar. To do this, at least one window must already be open.
To create a tab bar in a window, proceed as follows:
-
Open another window via the toolbar.
-
Drag it to the center of the already opened window.
The positioning tool for docking windows is displayed.
-
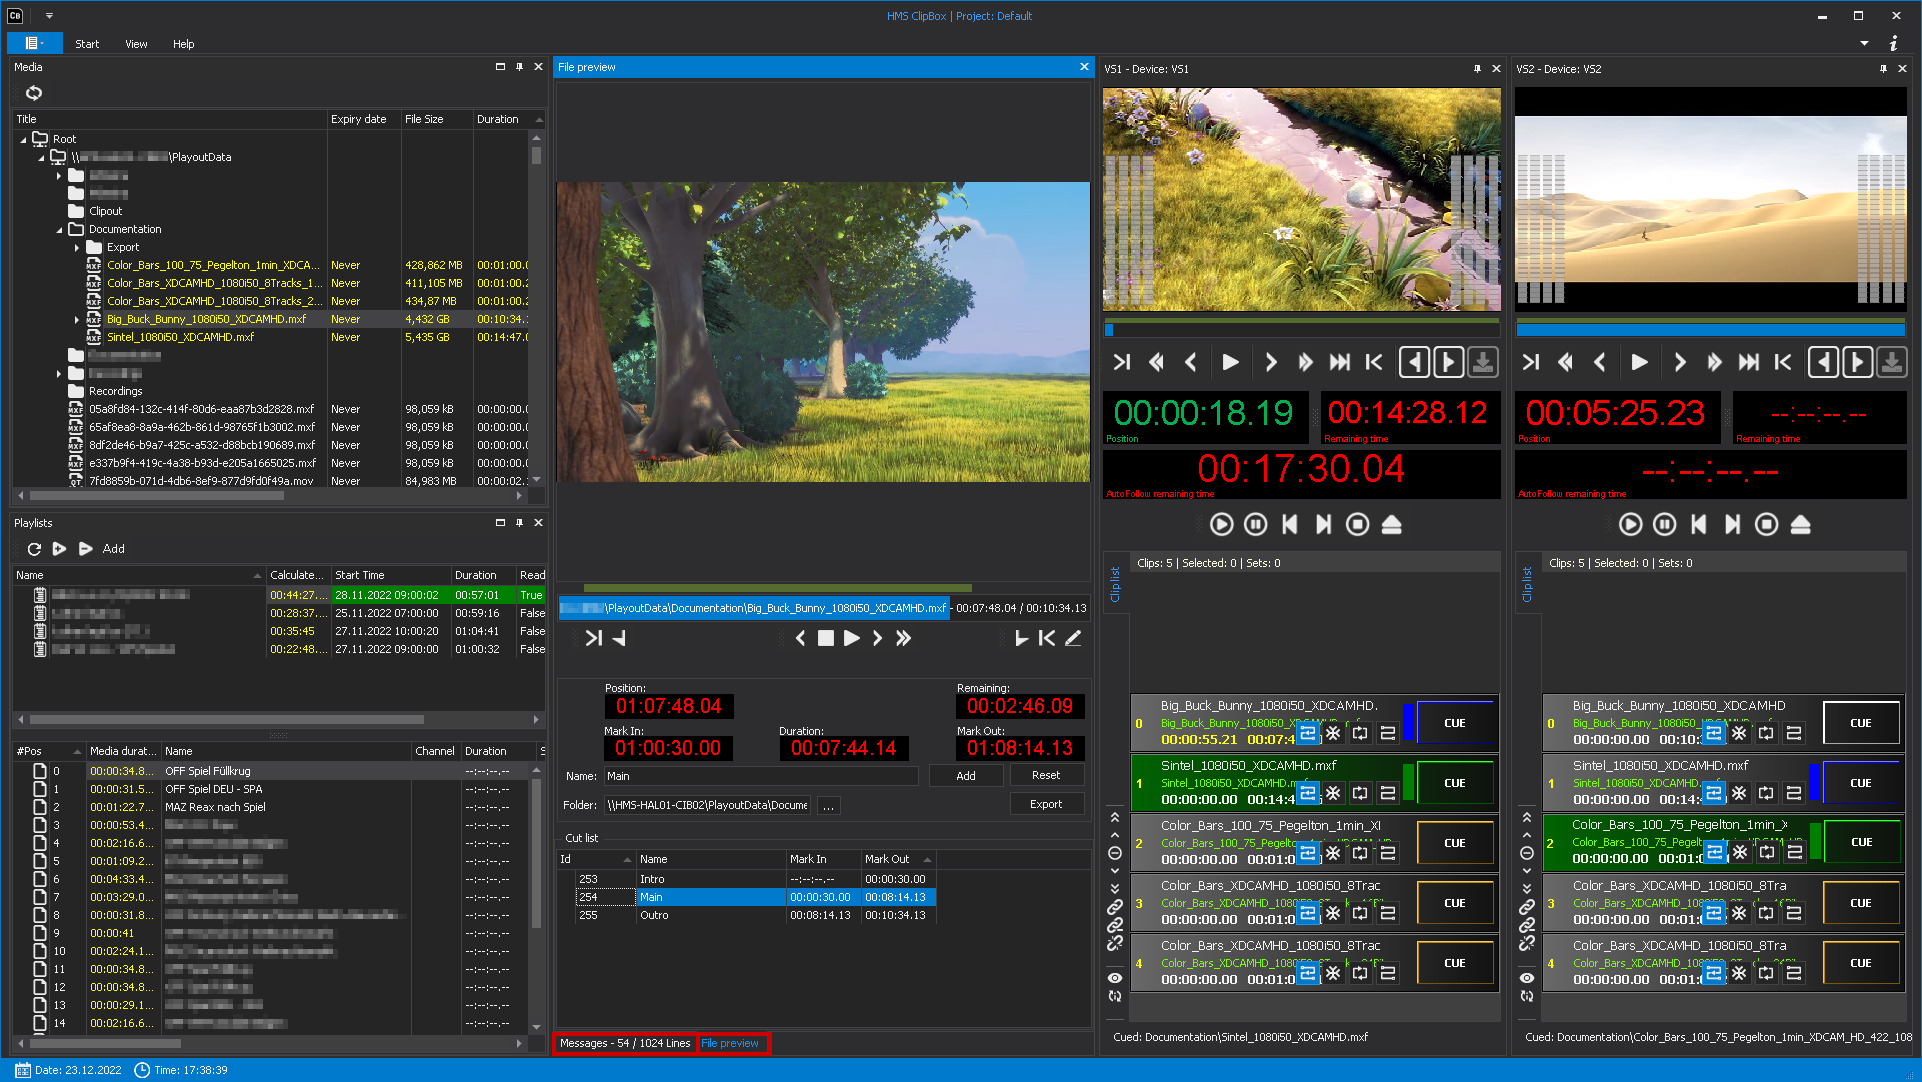
Select the position in the center as shown below.
Docking the window in the middle position Both windows (in the example the Messages and File preview windows) are now displayed in the tab bar at the bottom and can be selected.
Windows combined into a tab bar -
To add additional windows to the tab bar, repeat steps 1-3.
The selected windows are combined into a tab bar.